Stressed or Having Trouble Falling Asleep?
Are you struggling to stay organized and manage your time effectively? Do you have trouble falling asleep because of job stress or worry that you will forget to accomplish something at work?
If so, you are not alone!
I understand the challenges that come with balancing workloads and prioritizing tasks. That’s why I want to introduce you to the ICG Project and Task Management System, a powerful tool that can not only transform the way you work, but it can help reduce stress, and improve the quality of your sleep!
Effective time management skills are crucial for enhancing efficiency and productivity, allowing you to prioritize tasks, set goals, plan ahead, and delegate effectively. By using the ICG Project and Task Management System, you’ll experience better business results as you stay focused on the important tasks that drive success.
With this system, you can create unlimited projects, set milestones as benchmarks, and establish clear goals to keep your projects on track. Within each project, you can create task lists and assign responsibilities to team members, ensuring everyone knows their role and stays accountable.
By utilizing this system, you’ll not only see a reduction in stress and anxiety but also achieve a better work-life balance. You’ll have the peace of mind knowing that your day is highly organized, and important tasks will not be forgotten.
Don’t let time management challenges hold you back. Embrace the ICG Project and Task Management System to unlock your full potential, streamline your workflow, and achieve greater success. Start today and experience the difference firsthand.
Remember, success starts with effective time management!
Jeff Hastings
C.E.O.
Project Dashboard
A PROJECT can be a project you are working on, a client, and even a personal task list that you would like to better organize and manage. To get to your Project Dashboard, go to the Reports → Projects and Tasks.

Features of the project dashboard:
- By default, you will get to see the active projects with a grid view.
- However, you can select the completed option to view the completed projects.
- You can also change the Grid view option to List view.

- There is also a ‘Favorite‘ option to mark a project as a favorite to set priority when it comes to the appearance on the list.


- Also choosing a project category will only show the projects belonging to that particular category.


- There is also a global search bar to help you get to a project, task, task list, or subtask quickly.


- You can use the shortcut buttons to get to a task, tasklist, subtask, and so on. You will be able to view the progress of a project with a progress bar. When you hover on an icon you will see a tooltip demonstrating a brief overview.


- Use the three vertically aligned dots to delete, restore, and duplicate a project. Please note that these options are only available to projects that you create and are listed as the Project Administrator or Manager.

Creating a project
Creating a project is only a matter of a few seconds. You can create a project in just two steps.
Step:1
Go to Project Manager → Projects → New Project.
Step:2
When you click on the “New Project” button you will get a pop up containing options for creating a new project:

When creating the new project, you can add project categories from a drop-down. Adding a category to a project is optional though and not available on all accounts.
You can also add all the co-workers right from this modal window and if you check to notify, they will receive email notifications.
When you finish filling out the fields, hit the “Add New Project” button to create the project.
Note: Whenever you are naming a new project, try to give it a unique name because you can not create projects with the same name.
Milestones
Creating a milestone is very easy.
To change the status of a milestone or edit or delete it, go to the right buttons on each entry.

Task Lists

Creating and editing a task list
Go to Project Manager → Projects → Create a project or click on an existing project → Task lists tab.
After that, click on the “Add Task List” button. Then give a name and description for the Task List you are going to create. If you did not create the Task List within a Project, you will have the option to assign your list to a project.

Finally, click the “Add List” button to save the Task List. Next, you will be able to see the saved task list.
You can also click and hold the following icon to drag and drop or rearrange a task list among a list of task lists.

You will get four more icons to know the status of a task list:
Click the “eye” icon to get a single view of a task list. If you click on the icon, you will be redirected to this single task list page:
The progress bar will show the number of tasks completed in a task list.

Creating PRIVATE Task Lists
You can also get to know whether a task list is visible to others or not by the lock key. The unlocked icon means it is viewable to others in the project whereas the locked icon indicates that it is restricted to other users.
Adding tasks to the task list
To add tasks to a task list, just click on the following (red) marked area and type the task name.

On hitting the Enter button you can create the task. And the task will look much like this:

If you want to complete a task simply check the radio box next to it.

Please note that if you create a task outside of a task list, you will find it in the Inbox task list which is the default task list for any task without an assigned tasklist.

Creating a PRIVATE task within a shared list
Use the lock icon while creating a task to make it private and keep it viewable only by the preferred users. The lock is by default open. It will get locked after you click on it.

You can add a description for a task with a full-fledged text editor. Click the task and the following icon to get the editor.

You can add preferred users by clicking this icon. You can also use the search bar to find your desired users

To add dates to the task use the calendar icon and select a date.

Finally, click the “Update” mark to save the task.

Use the “Show completed task” option to see which tasks have been completed.

If you click on the “Show completed task” button then you will get the tasks that have been completed.

Adding sub-tasks to a task (module required)
To break down your tasks into further divisions, you need the Sub Task module.
First turn on the module from WP Admin Dashboard → Project Manager→ Modules. Find the Sub Task module and enable the toggle button.
Next, after you have added a task, click on that task. After that, you will get a modal window for creating the subtask:

Next, click on the enter button from your keyboard to create the subtask. Here is an example of a subtask.

Use the three vertically aligned dots to get the option like the URL link of a task. For every task, you will be able to get and copy the unique URL to share with others.

In this modal window, you will be able to edit the main task, such as, add a deadline, description, make the task private for yourself, or discuss it with others.
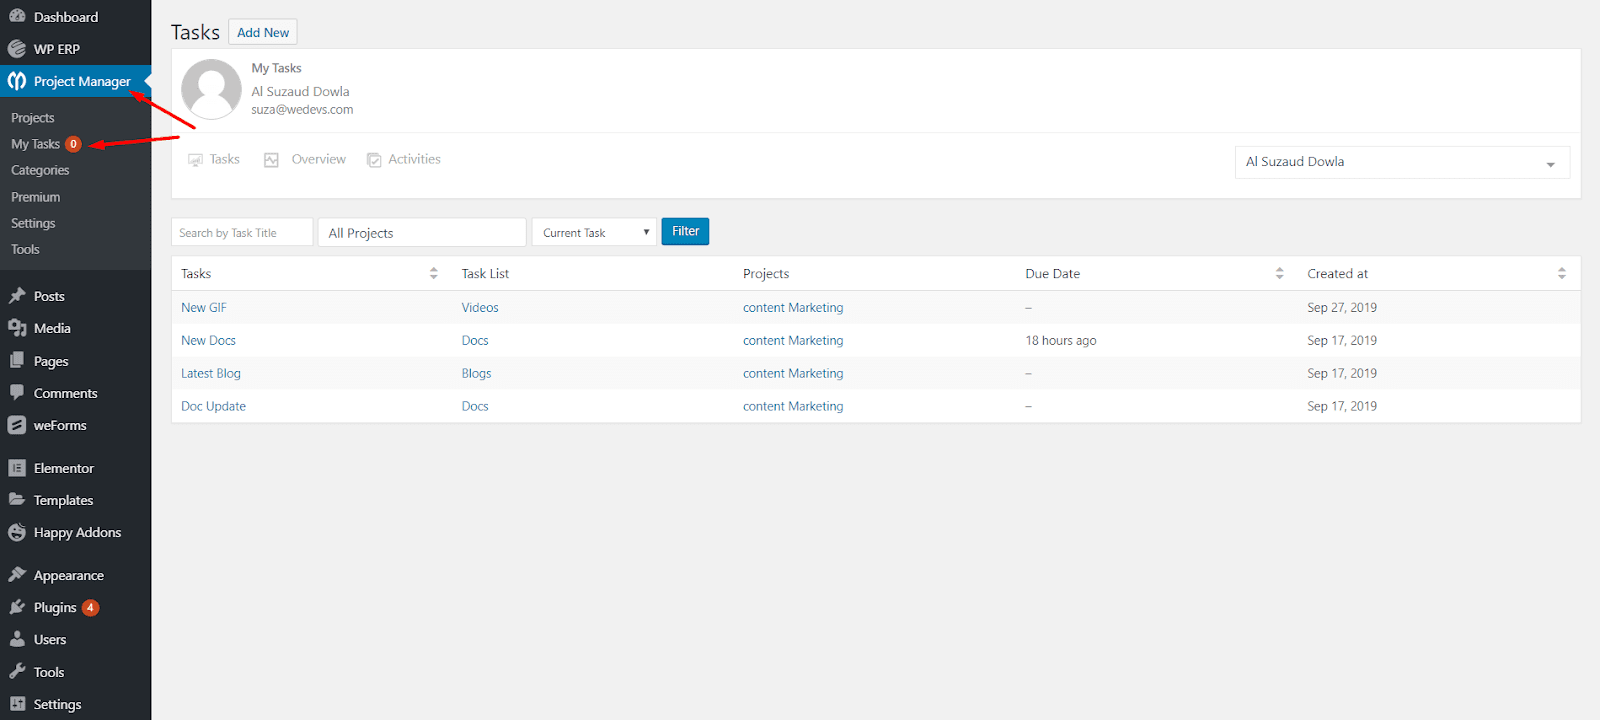
My Tasks
Project Manager → My Tasks
My Tasks – Current Task
You will get a handy dashboard where all your current tasks are available. This page shows a quick view of your current tasks. There is a drop-down box where you can also check your Outstanding and Completed tasks.
You can also search your task by selecting ‘Task Title‘ or ‘Project‘ from the drop-down box.
Add New Tasks (Feature Update!)
With our new version of the WP Project Manager, you can now add a new task directly from your dashboard. Click on Add New button. Then you will get a pop-up window where you will choose a project, choose the task you want to create a task under, and the name of your task. Hit Enter and the task will be created. You can view the task in ascending or descending order.
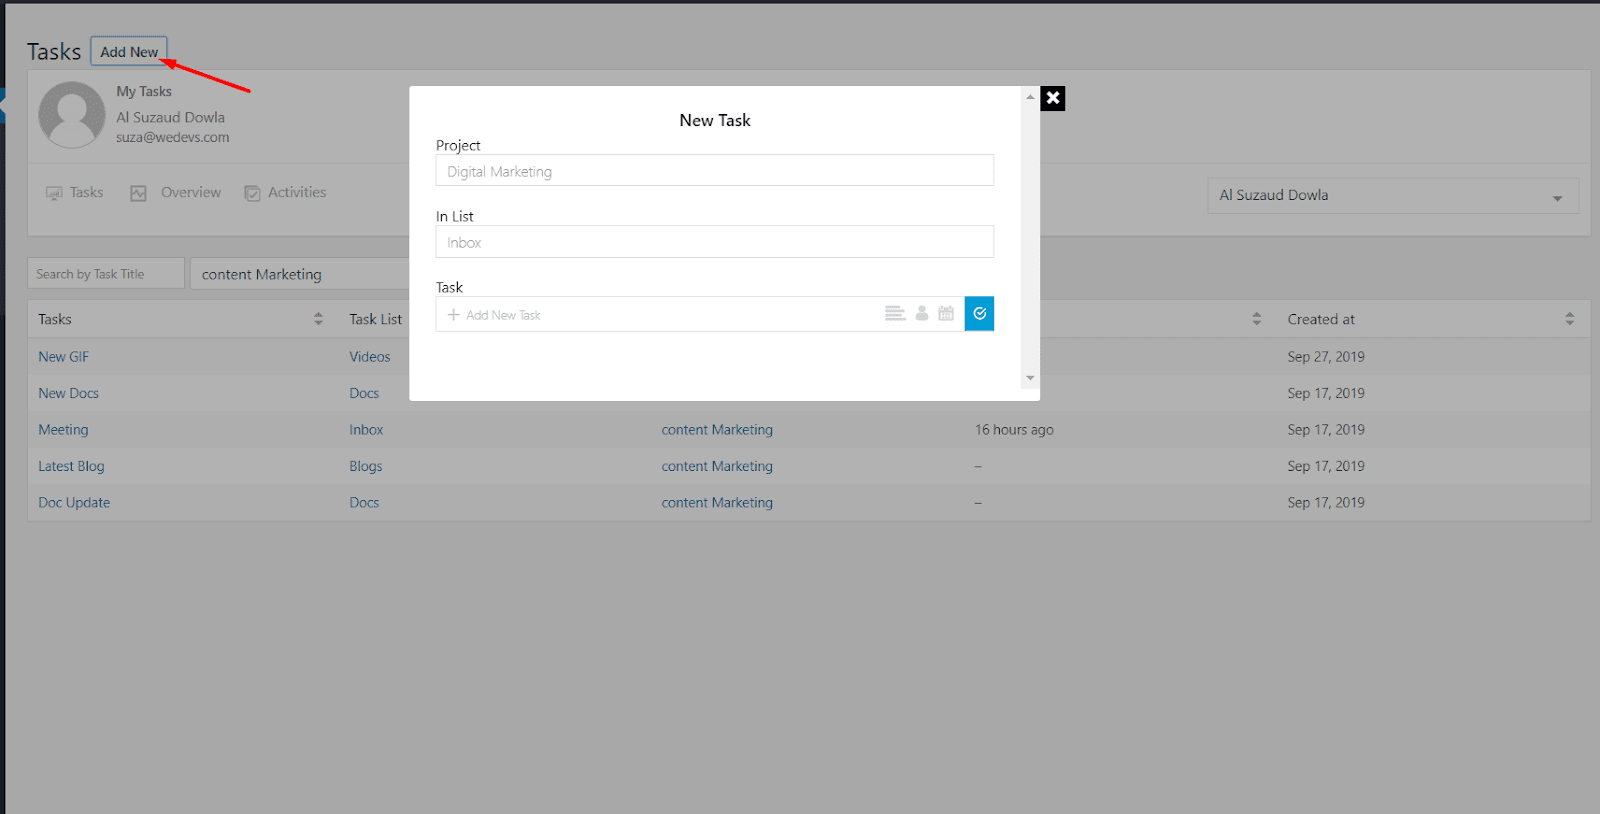
Check out the GIF below, to get an insight on how to create a task from your dashboard.
Overview
To get an overview of your work, navigate to
WP Admin → Project Manager → My Tasks → overview.
The overview page shows a quick view of your tasks including the current, outstanding and completed ones. There is also a chart for your activity. This visualization shows an overview of your activities over a certain period.
You can also view your calendar. It specifies your to-do lists and tasks according to their working dates.

Activities
To view all your activities details, navigate to-
WP-Admin → Project Manager → My Tasks → Activities.

Outstanding Tasks
To get all your outstanding task details, select “Outstanding Task” from the drop-down box and click on “Filter”. You will be able to view all your outstanding tasks.

After clicking “Filter” you can view your outstanding tasks.

Completed Tasks
To view all your completed tasks, select “Completed Task” from the drop-down box and click on “Filter”. You will be able to view your completed tasks.

After clicking “Filter” you can view your completed tasks.

View Activities of Other Users
Admin can view the activities of all other users. Navigate to
WP-Admin → Project Manager → My Tasks
There is a drop-down menu on the top-right side of the page. From there, you can select any user who is assigned to the projects. This can also be done from the rest of the activity task tabs.

That’s it!. And this is how WP Project Manager will serve you from now on. Enjoy the tutorial.
Discussions
Step: 1
To use the feature, you will have to navigate to Project Manager → Projects → Select a project.

Step: 2
Next, click on the ‘Discussions‘ tab.

Step: 3
After that, you will get a discussion panel which can be used to create an open discussion, group discussion, and private conversation.
Click on the “Add New Discussion” button to get options for creating a discussion.

After clicking on the button, you will get the following interface with a view to giving a name of your discussion, adding a comment, attaching files, selecting relevant milestones, selecting users, etc.

Note: you can select all the users to make the discussion open, or create a group discussion by selecting a few users from the total list of users.
Step: 4
Hit the “Add Message” button to create the conversation:

What’s more?
Your notified users can participate in the discussion by commenting.

Any participator can also attach files so as to submit their tasks in the form of documents, images, zip file,s and so on.

If you have created multiple discussions, you can view them easily by navigating to the discussion tab:

That’s how you can use the discussion feature of WP Project Manager.
Calendar

If you want to view any of your team’s shared tasks, select the project then choose the user. Click on the Filter button to see that user’s task.
Calendar Color Annotation
This area shows you the explanation of the differently colored taskbars. With the colored taskbars, you can quickly get to know whether a task is incomplete, complete, or outstanding. You can also see if there is any milestone with the help of color.

Taskbars
You will see different bars that indicate the status and duration of the tasks. These are called taskbars. The longer the duration of a task the more stretched the bar for that task will be.

The Red bars represent the due tasks or outstanding tasks or the tasks that have a starting date but do not have a due date.
The Green bars represent the ongoing tasks or the tasks your team members are working on.
The Blue bars represent the completed tasks.
The light Blue bars represent the milestones you set for the project.
Filtering the Calendar
When you navigate to the calendar, it will show all the tasks for all the projects and users on your team. But you may wish to see only the tasks for a particular project and user.
Luckily, you can filter the tasks shown on the calendar using three methods:
- One is selecting a project
- Another is selecting a user.
- The other is by selecting both a project and a user.

Filter by Project
Choose a project from the dropdown list and hit the Filter button in order to see your desired project’s tasks.

You can also choose the monthly, weekly, and daily options to see the tasks.
Filter by User
Choose users from the dropdown and hit the filter button to see the tasks of those users only:

Filter by Both (Project and User)

You can also specify projects and users together and filter the tasks accordingly:
Users, Monthly, Weekly, and Daily View
You can get 4 types of views in the calendar. They are:
- Users View
- Monthly View
- Weekly View
- Daily View
Users View
See all the tasks from the users’ perspective by selecting the User View tab.

However, you can also choose certain users and projects to filter tasks and get a user view.

Note :
- The user view will only show tasks for one week.
- You can easily navigate between dates in this view using these two icons (<,>).
Assigning Tasks in User View by Dragging and Dropping
You can also assign tasks from one user to another user by simply dragging and dropping a task in the calendar.

For example, you have two users. One is Felipa and the other is Gladyce. Now, if you move a task of Felipa to Gladyce by dragging and dropping then Felipa will no longer remain assigned to that task. Rather Gladyce will be assigned to that task.
Another thing is when you are dragging and dropping a task to a different date the date will also be changed accordingly.
Monthly View (Default View)
Selecting this option will only show you the tasks on a monthly basis. Use the left single arrow and the right single arrow to navigate to the previous and next months.

Weekly View
Selecting this option will only view the tasks on a weekly basis. Use the left single arrow and the right single arrow to navigate to the previous and next weeks.

Daily View
Selecting this option will show you the tasks on a daily basis. The daily view counts and shows tasks from 12 a.m. to 11 p.m. of a day and so it is a 24-hour-calendar view. Use the left single arrow and the right single arrow to navigate to the previous and next days.

Note
- you can use the ‘today‘ button to quickly navigate to the tasks for the current day you are working on. The button remains deactivated if you are already on the day you are working.

Drag and Drop Tasks
The dynamic and interactive drag-and-drop functionality will provide you with a seamless experience. For example, on 19th August, you see that the following “test task” has a start date of 17th August and the due date is 18th August. Thus on 19th August, the task will be due and so it will be red.
If you drag the task and drop it on the next day it will automatically become an outstanding task and the color will also be changed. If the color does not change then consider reloading the page and the color will change on its own.

Creating Tasks
You can also create tasks very easily in the calendar. This works in all view (User view, Monthly view, Weekly view, and Daily view) options.
To do so, select a blank area or the date on which you want to create a task. After that, you will get a pop-up to add tasks. You can select a project, specify a task list, give a project name, add users, set a deadline, give a label and so on.

Edit Tasks and Create Subtasks
If you click on any taskbar a window will pop up on the screen to edit tasks and add subtasks. Assume that we click on the following taskbar:

A pop window for editing the task will appear immediately. From here, you can edit the task name, change the start date and the due date, etc. You can even create subtasks and add time logs from therein.

That’s all about Project Manager Calendar.
Activities

With WP Project Manager Free 2.0.6, when you delete a task, the activity will appear in the Activities log.

The deleted task log will appear in both the Activities section of My Tasks and in the main Project.
My Tasks Activities:

Main Project Activities:

Files
- Simply go to the Files tab from any Project and click on the + Upload a file button
- Click on Attach a file button and choose the file from your computer.
- You can add multiple files at once, choose more if you need to.
- To proceed with uploading, click on Submit.

Creating a folder
- Simply click on + Create a folder
- Enter the name of the folder
- Tick to make this private
- Now click on “Create Folder” to complete the action

Creating a Document file
- To create a document file, click on + Create a doc
- Enter the document title
- Write the things you need to note
- Click Create a doc
- You can also make this document file private by checking Make this private before creating the doc.

Uploading or creating a file or sub-folders inside another folder
- Click on the folder that you want to upload a file or folder
- At the top right corner, you will find all the 4 options again. You can upload files, and create folders, docs, and links to docs, the same way you do in the Files Manager home.
- For example, click on + Upload a file.
- A file upload tool will appear.
- Click on Attach a file button and Select your file
- Click on the Submit button and save the file. You can also click Delete file if you need to delete it
- To make it private, check Make files private.

Linking an external doc/file to the file manager
- Simply click on the + Link to Doc
- Enter the Title of the doc
- Provide the link to the doc
- Add notes if required
- Click the Link to Doc
- View the linked Doc.

When you click on the file now it will take you directly to that link.
Commenting on a file or document
- Simply click on a file or document that has been already created or uploaded
- A new preview will appear
- Write down the comment in the comments section.
- You can add links or format the text according to your requirement
- If you need to attach a file, click on Select Files
- Click Add Comment to save.

File Manager Sharing and Privacy Settings
- To access the file manager settings, click on a project
- On the right side of the Files tab, you will find Settings. Click on it
- At the bottom of the page, there is the Files section
- You can control what co-workers and clients can do
- After enabling or disabling the options, click on Save Changes.

Removing or updating a file/folder/doc
- To update a file/folder/doc, click on it
- You will find the Edit button on the right top side
- After clicking on it, you will be able to update the doc according to your requirements

- You can also delete the file/folder/doc by clicking on the delete button on that file/folder/doc


Keeping a backup
- You can always keep a backup of your files if required
- To do so, click on the file/doc, and a preview of the file will appear.
- Click on the Download button to save the file and create a backup.

Uploading Video Files
With the ICG Project and Task Management System Pro 2.0.8, users will be able to upload videos on the files tab, as well as on comments and messages. Free users will be able to upload videos in comments and messages.
The default file size has been given as 2MB.

To upload videos in the Files Manager, simply click on Upload a file, then click on Attach a file, then select your video. Then click on Submit.
Files:

Similarly, to upload a video in a task comment, click on the Attachment icon, then select your video file, then click on Post Comment. You will need to write some text too in order to successfully post your comment.
Comments:

In the same way, upload a video in your message under Discussions, open a discussion, click on the Select Files button underneath, select your video, then click on Add New Comment.
Messages/Discussions:

If the files supports HTML 5, admins will be able to view the file directly from project manager. If the file doesn’t support HTML 5, the file needs to be downloaded for viewing.
Viewing video from files manager:

Viewing video from discussions and comments:

Copying Folder to Another Folder
You can easily copy one folder to another folder. The same goes for files. The process is simple.
After creating files, click on the Move button. It’s situated on the bottom of every file.

A pop-up will appear. You need to choose the folder where you want to store the folder or file.

After choosing if you click on the selected folder then you will see the copied folder.

See, that is how easy it is to copy one folder or file another folder.
Progress
You get a quick detailed view of the progress of your projects. To get the list, navigate to-
WP-Admin → Project Manager → Progress
You will be redirected to the progress page where all your activities based on their working dates. It also contains the project name, to-do list, activities and tasks.

Gantt Chart
Location of Gantt Chart Module in WP Project Manager
To access your Gantt Chart, go to Project Manager → Projects → Select any project you wish to view.
After selecting the project of your choice you will see the Gantt Chart on the far right side of the menu. Click on it to view.

Expand the duration of the tasks
Gantt Chart allows you to expand the duration of tasks. On the top, you will see the date, day, and month. You can expand your tasks by dragging to the left or right by clicking and holding the edges of the tasks.

NOTE: You do not have to edit the due dates for the project or tasks, the due date for any task will be changed according to the graphs.
Move tasks to any date
If you want to push a specific task to a later or an earlier date, you need to click and hold the task and then drag and drop it to your desired date.
For example, the first task was supposed to be done from the date 6 to the date 7 but after moving it we can see that it is due from the date 8 to the date 9. Here is a screenshot:

If you click and hold on a task list and drag it to the right then the due date will be extended. Similarly, if you click and hold on a task list and drag it to the left then the due date will be shortened accordingly.
Add a New Task or Task List while keeping it categorized
But, with the Gantt Chart, you can create new tasks right from the Gantt Chart tab.
Simply select on the + icon from under the Action (caption) category to create a new task while keeping it categorized:

A task editor window will pop up for you to enter all the details:

From here you can create a new task, assign it to your co-worker, define a due date, and mark it as private.
Adding Task List
However, to add a Task List, you can use the first (+) icon right from the Action tab to create a Task List directly:
![]()
Add the Task Lists or Tasks of other Projects
Yes, it is possible. When you hit the (+) icon of the Action tab, you will get a form to add a Task List or Tasks. If you click on the Task List name field or Task name field, you will get a bunch of suggested Task List names or Tasks from the other projects.
To get the suggested Task List names from other projects, you will have to click on the first (+) icon right beside the Project group. Here is a screenshot that indicates suggested Task List names which are shown from the other projects:

To get the suggested Task names from other projects, you will have to click on the first (+) icon right beside the List group. Here is a screenshot that indicates suggested Task names which are shown from the other projects:

Link tasks to each other
Suppose that you want to link up two or more specified tasks from the Gantt chart. You can do it by joining the circularly shaped icon of one task to the other.

First off, you will have to click on a taskbar after that you will get two circles. Then you can click on one of those circles and drag them to connect with other tasks’ circles.
Please note that you can only hook up a later task to an earlier one and you can not connect an earlier task to a later one.
Groups
With the release of version 2.0.1 a new option called ‘group’ has been added to the Gantt Chart. With this option, you will be able to know which project contains how many task lists, tasks, etc. Here is a screenshot:

Open or close Task List
You can use the (-) or (+) icons to open or close folders to navigate more easily between the task lists and tasks. The project and task lists are like folders while the tasks are like files. Use the (-) icon to close a folder and use the (+) icon to open a folder.
Double-click to see the details and edit
If you double-click on any Task List or Task then you will be able to view their details and get the options to edit them. For example, let’s double-click on the Task List “Content for WP ERP” to view the details and edit it:

After double-clicking on it, you will get the details and options to edit it:

After editing the Task List, don’t forget to hit the “Update List” button.
Please note that this double-click editing feature is applicable for the Task List and Tasks not for the Project.
View Reports

To view reports navigate to Project Manager → Reports.
We have added several predefined report cases depending on user feedback. The reports are very much self-explanatory.
Overdue Tasks
Lists tasks from the project that have passed the due date but are not completed yet. Now you can find out which tasks you need to get off from your waiting list first.

Complete Tasks
Tasks that were completed from all to-do lists. Tasks which you can relax about.

User Activities
A complete review of all the tasks created or deleted by all co-workers. It is also possible to create reports for specific user activities. All you have to do is select the user name and time frame.


Project Task
A complete report showing all your tasks from projects. You can also generate reports for complete and incomplete tasks. When you select this report a popup with be displayed and you have to choose what kind of report you want to generate and press the Run Report button.


Task by Milestones
Displays all the tasks according to specific milestones. You have to select a project and assign milestones to generate this report. You can also export this report to CSV file format.


Unassigned Task
This report lists all the tasks which were not assigned to any of the users.

Summary
This report will help you give a snapshot of your projects’ every aspect. The most amazing thing is that you can customize the attributes of your project report to get the report according to your preferences.
To get the report, select the ‘View Full Report’ button:

Next, you will need to set the filter of the report. Click on the ‘Filter’ button:

Next, you will get a pop-up to set the filter option. You will get the following options:
- Report type: By default, it is set to ‘Summary’. However, you can also select the ‘User’ radio button.

- Summary type: To enable this ‘Summary Type’ option, you must select the ‘Summary’ radio button from the ‘Choose report type’ option.
By default, it is set to the ‘All Project’ option. But you can click on the dropdown menu and select either ‘All Project’ ‘Task List’ or ‘All User’.

- Start Date and End Date: Set a date range to get a report during that period.

How the estimated time report will look like?
Here is an example of an ‘All Projects’ estimated time report based on the ‘Summary’ type:

Here is an example of a ‘Task List’ report based on the ‘Summary’ type:

Here is an example of an ‘All Users’ estimated time report based on the ‘Summary’ type:

Finally, here is an example of an individual user type-based estimated time report:
v2.3.3 Update
With the new release of version v2.3.3, this module will include two more report filters. They are:
- Project vs user

- User vs project

These filters will generate reports with graphical representation.
Project vs user
If you select this option, you will be able to know which user has given how long in their assigned projects. If you hover your mouse pointer on the graph then you will get a tooltip describing the details.

User vs project
If you select this option, you will get to know how many users have spent time on a project. Like project vs. user, if you hover your mouse pointer on the graph then you will get a tooltip describing the details.

The advanced report is the old report
We didn’t completely remove our old reporting system because of its complete manual capacities. You can still access it by clicking Advanced Report.
On this page, you will be prompted to select a project to generate the report or to export it to a CSV file.
- Use the drop-down menu to select your desired project.
- Use the “+” button for selecting multiple projects.
- Click Generate Report to view project report(s).
After clicking the generate project button, you will see your project reports in detail as Project Name, Task List, Title, Task, Assigned Person’s name, Start Date, Due Date, Status, and more in detail by clicking on them.

How to Export to CSV
After getting reports, you can export your reports as an Excel file for backup. Click the “Export to CSV” button and a file will be downloaded.

After downloading the file, you will see it in your browser downloads and download folder on your PC. Now you can open your file to see your project report just navigate to your download folder and open your desired file and you have done.

If you have any feature requests or having difficulty understanding this doc, please open a support ticket.
Adding users to a project

New User?
You can add new users by typing out a name in the user search bar. If it doesn’t exist in the database, it will show you an option to Create a new user.

Click on it and fill out the details on the modal window, as shown below.

Click on Create User to finish.
Finally, click on Update Project to save the changes.
Time Tracker
Configuring Time Tracker
The Time Tracker module lets you track how much time you spend on each task inside of a Task Lists Tab. To start tracking time on your Projects, follow this:
Start Time Tracking
- To start tracking the time of a task, go to the Projects menu and click the relevant project.
- Click on the Task Lists tab.
- Here, if you have a task or tasks created from all along, click on the task. Now, you need to assign a logged-in member. Then you will see the Time Tracker option.
- Click the Marked icon to start tracking time for that task. You will see the clock start tracking your time.

- To stop the Time Tracker from tracking time, simply click the Stop option while the time tracker is active. On doing that, you will see the clock will stop and show you the amount of the tracked time.

- Each time you start and stop tracking time a time log will be created on the single task page. If you want to see the time logs then simply click on that task:

- And you will be able to see the following modal window. By default, you will be able to see the last time you logged there. However, to view all the time logs, click on the down arrow:

- After that, you will be able to see all the time logs. There is also an option that will show you the total calculated time.

Add Custom Time
You can add custom time to Time Tracker. Follow the steps below to add manual time to your tasks.
- Simply click on the Custom Time option from a task.

After that, you will get options to insert the start time and end time manually:

- Finally, click on the Add button to save the manually tracked time.
Estimation Field:
With the release of the ICG Project Manager Pro version 2.3.1, make sure you do the following:
- Turn on the Time Tracking Module.
- Assign only one user to each task or subtask.
Adding Estimated Time for a Task
- To set an estimated time for a task, go to the Projects menu and click on a relevant project.
- Click on the Task Lists tab.
- Now, give a task name and assign a user to it.
- Next, you will get a clock-like icon to set the estimated time:

- Set the estimated time for the assigned user in the Hours: Minutes format:

- Now, click on the ‘tick’ mark to add the task.

Adding Estimated Time for a Sub Task
- To set an estimated time for a task, go to the Projects menu and click on a relevant project.
- Click on the Task Lists tab.
- Create a task.
- Now, click on the task and create subtasks. Now, assign users for the subtask.
- Now, you should see the clock-like icon on the subtask editor.
- Set the estimated time for the subtask and click on the ‘tick’ mark to add the subtask.

That’s all about the Time Tracker module of the ICG Project Manager.
Note 1: One must be assigned to a certain task to track his/her time for that task.
Note 2: One can track only one task at a time.